
A great apartment coffee station needs a 60 x 40 cm patch of counter, a tray, a grinder, a kettle and a dripper. Put water on one side and grounds on the other, keep the daily tools on the tray, and move everything else to a shelf above. Budget $150 for the manual version and about $350 for the comfortable one.
Why 60 by 40
Sixty by forty centimetres is the end of a standard kitchen counter, the top of a narrow sideboard, or one bay of an IKEA shelf. It is enough room for a kettle, a grinder and a brewing tray to sit side by side without anything hanging off the edge, and small enough that the station stays a station rather than spreading across the whole counter.
If you have more room, resist the urge to fill it. The reason small stations work is that everything you touch daily is within a hand’s reach and everything else is somewhere else.
The layout
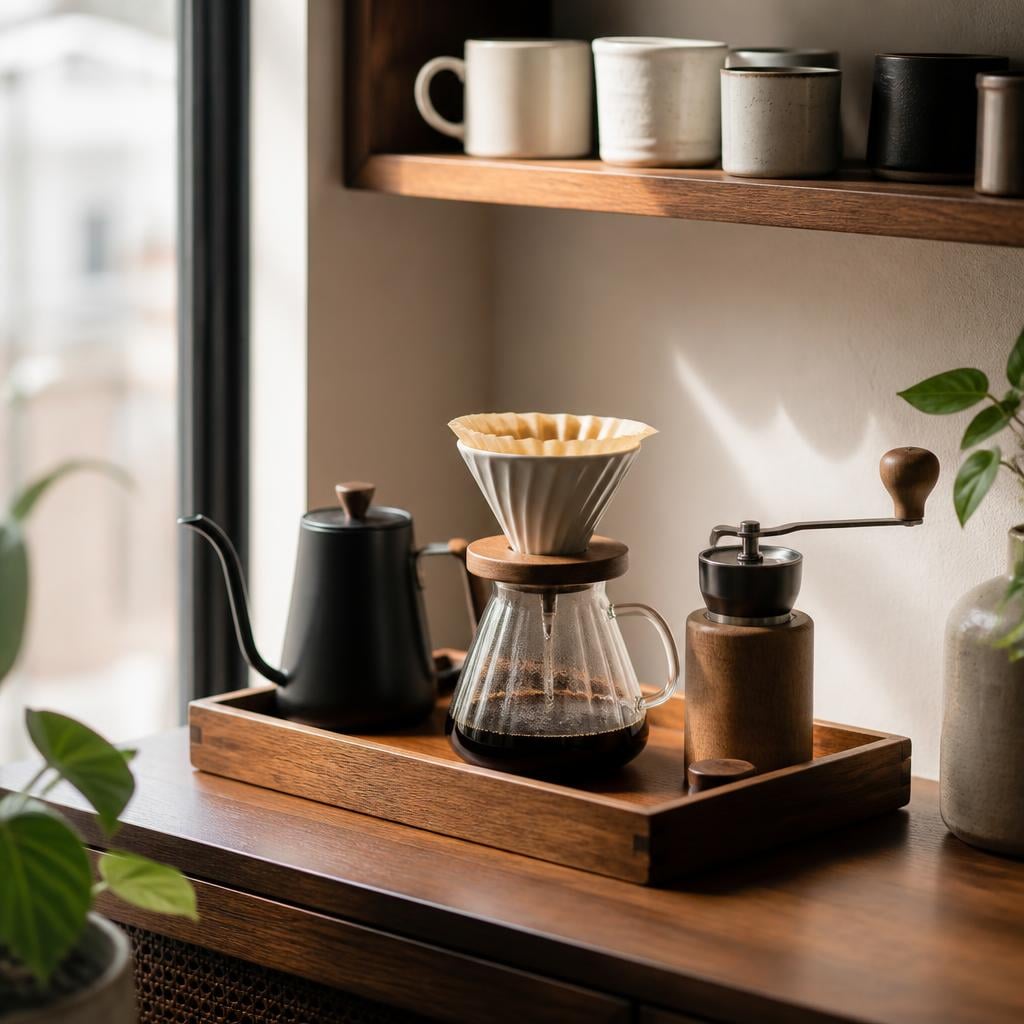
Kettle at the back left, grinder at the back right, tray in the front middle. Three rules make this work:
- Water and grounds never meet. The kettle lives on one side and the grinder on the other, so steam and drips never end up in the burrs and coffee dust never ends up in the kettle base.
- The tray is the workbench. The dripper, scale and one small bean canister live on the tray. Spills land on the tray. When you need the counter for cooking, you lift the tray away as one unit.
- Vertical storage takes the rest. A single shelf above the station holds the cups, filters, a bottle of filtered water and the beans you are not currently drinking. The counter stays clear for pouring.
The cable problem
The kettle base is the only thing that needs power. Put it at the back on the side nearest the outlet, and run the cable behind the tray, not across it. If the outlet is on the wrong side, a short flat extension lead taped along the back edge of the counter is tidier than a cable draped across the station.
The five things you actually need
- A burr grinder. Fresh-ground coffee is the biggest flavour upgrade you can buy, bigger than any brewer. The Baratza Encore is the usual first electric grinder; the Timemore C3 is the hand grinder we put in every small-space plan because it fits in a mug. Our Encore vs C3 comparison covers when each makes sense.
- A kettle you can control. A gooseneck spout makes pour-over easy because you can put the water where you want it. The Fellow Stagg EKG adds temperature control; a stovetop gooseneck is the budget option and takes up no counter space at all because it lives on the hob.
- A dripper and filters. Hario V60, Kalita Wave or a Chemex. All make excellent coffee. Pick the one whose filters are easiest to buy where you live; a dripper with no filters is a paperweight.
- A scale with a timer. Guessing ratios is why home coffee tastes different every day. Set the ratio once with the brew ratio calculator and weigh the same numbers every morning. A 0.1 g kitchen scale with a timer costs about $20.
- Two cups you love. Everything else on the station can be plain, but the cup you drink from every morning should make you happy. This is also the only decoration a small station needs.
Three budget tiers
| Tier | Grinder | Kettle | Brewer | Total |
|---|---|---|---|---|
| Starter, about $150 | Timemore C3 hand grinder | Stovetop gooseneck | V60 plastic, scale, tray | $150 |
| Comfortable, about $350 | Baratza Encore | Fellow Stagg EKG | V60 ceramic, scale, wooden tray, wall shelf | $350 |
| Dream, about $600 | Baratza Encore ESP or Fellow Ode | Stagg EKG Pro | Chemex plus V60, scale, oak tray, shelf, canisters | $600 |
The setup budget planner lets you tick off the things you already own and see the real number. Most people already have a kettle and cups, which takes the comfortable tier to around $250. The full shopping list with notes is in the apartment corner plan, which also has a printable one-page version.
What to skip
- Pod machines. They take up the same space as a grinder and a dripper, make worse coffee, and cost more per cup. The whole point of a small station is that it makes better coffee than the big one.
- A standalone milk frother. If you drink lattes, a $12 handheld frother lives in a drawer. A countertop frother is a second appliance on a 60 cm counter.
- A second brewer. One brewer you know well beats three you use occasionally. Add the AeroPress later if you want speed on weekday mornings.
- Bean hoppers full of beans. Buy 250 g bags, keep one open on the tray and the rest sealed on the shelf. Beans in an open hopper go stale in a week.
- Anything that needs its own outlet. One cable is tidy. Three is a kitchen.
Making it look like a café corner
A small station looks intentional when the materials match. Pick one wood tone and one metal finish and stick to them: a walnut tray with a matte black kettle and grinder, or a light oak tray with white ceramics and brushed steel. The shelf above is the place for the one or two objects that are there for looks, a small plant, a framed print, a bud vase. The trinket shelf guide covers how to arrange that shelf so it feels curated rather than cluttered.
Lighting matters more than people expect. A warm 2700 K bulb in a small clip lamp or an LED strip under the shelf turns a dark corner into the nicest spot in the kitchen at 7 a.m.
A weekday morning at the station
- Fill the kettle from the bottle on the shelf and switch it on. On the Stagg that is 94 °C for a medium roast.
- Weigh 20 g of beans into the grinder and grind while the kettle heats.
- Rinse the filter, tip in the grounds, tare the scale.
- Pour to 40 g, wait 40 seconds, then pour in slow circles to 320 g. Total time around three minutes.
- Wipe the tray, put the dripper in the sink, put the cup on the shelf when it is empty.
Five minutes from switching on the kettle to the first sip, and the station looks the same as it did before you started. That is the test of a good layout.
Upgrade path
Start with the starter tier and upgrade one thing at a time when it starts to annoy you. The usual order is grinder first (hand to electric when you are making more cups), then kettle (stovetop to electric when you want temperature control), then a second brewer. The footprint never changes; everything in this guide fits the same 60 x 40 cm corner. More layouts for offices, dorms and vans are in Coffee Stations.
Watch the short version
Frequently asked questions
Do I need an electric grinder for a small station?
No. A hand grinder saves space, money and noise; an electric one saves about a minute each morning. Pick the one that matches how many cups you make. One or two a day, go manual. Three or more, go electric.
What if I only have a windowsill?
Use a tray you can lift down to brew, then put back. A 40 cm tray with a hand grinder, dripper and scale works on a sill, and the kettle can live on the counter.
Can I do this without drilling into the wall?
Yes. Use a freestanding two-tier counter shelf or a tension-rod shelf in a nook instead of a wall shelf. Renters lose nothing except a little headroom.
Where does the water go?
A one-litre glass bottle of filtered water on the shelf above. You refill the kettle from it, and it means you never carry a hot kettle to the sink and back across the station.
Tools and gear mentioned
Coffee Station Budget Planner
Pick a space and a budget tier and get an itemised shopping list.
Coffee Brew Ratio Calculator
Coffee-to-water for pour-over, French press, AeroPress and espresso.
 grinders
 kettles
 grinders